Welcome to the new world of Meshy AI which allows anyone to turn their thoughts into amazing 3D models! No matter if you’re an experienced artist or just interested in the world of 3D,this guide or article will walk you through the basics and allow users to unlock their imagination.In the previous post i have review Meshy AI in detailed ,it’s features and use cases.
How To Login/Sign Up Meshy AI Step-by-Step Guide
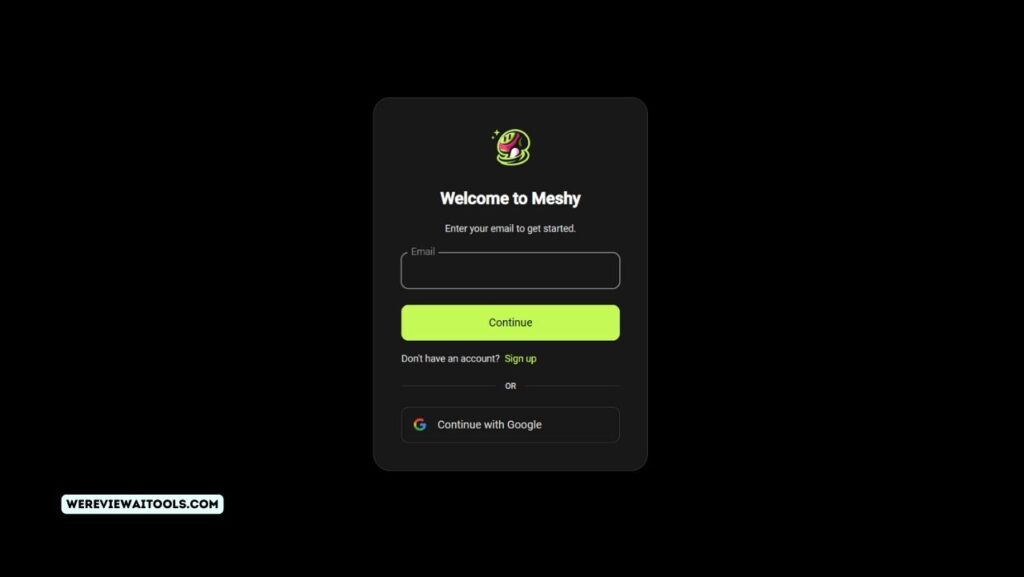
Signing Up:
- Visit the Meshy AI website: Visit to website and find”Sign-Up Now! “Sign Up Now!” button.
- Choose your method: You can sign by using an email address as well as a password or choose a quicker social media login using Google and Facebook.
- Complete the form: If using email registration, fill in your full name as well as your email address and your preferred password. Be sure to set up an extremely secure, secure password.
- Accept the terms and Privacy: Make sure you accept your privacy and terms of service policies prior to beginning.
- Welcom to the group! Click the “Sign Up” button and you’ll become a part of the Meshy AI community.
Logging In:
- Return to the website: If you’ve already established an account, head right back on Meshy AI. Meshy AI web site.
- Locate the login section: Look for the “Login” button or link generally found in the upper right corner.
- Log in with your login details: Use the email account and password linked to you Meshy AI accounts.
- Stay registered (optional): If you don’t want to have to enter your information each time select for the “Remember me” box (if there is one).
- Select “Login” and explore! You’re now signed in and ready to begin making amazing 3D models.
How to use Meshy AI?
1. Getting Started:
- Register your account Go to Meshy AI website and sign up to get an account for free. This gives you access to the basics of Meshy AI and lets you try out the features before you decide to sign up for paying for a plan.
- Explore the Interface: Its interface appears clear and intuitive, featuring easy-to-find buttons and options. Get familiar with your familiarity with the “Text to 3D” and “Image to 3D” tabs which are where the magic occurs.
- Consider subscription plans: If you need more features, such as high-resolution models or more styles, you should consider changing to a paid subscription. Select the plan which best meets your requirements and budget.
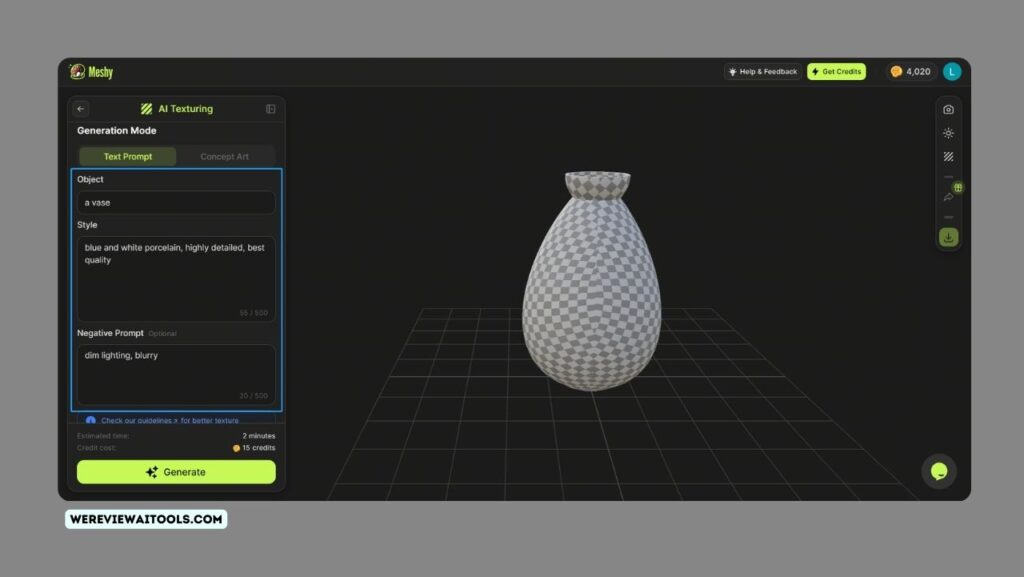
2. Master the Art of Text-to-3D:
- Create your own summary: Here’s where your imagination comes to the forefront! Write down the 3D model you’d like to create in the most precise way feasible. Be sure to mention its dimensions, shape and texture as well as any particular features you’re envisioning. Keep in mind that the more precise your description is, the more precise Meshy AI will be able to comprehend your vision.
- Keywords will be your best friends: Research keywords related to the model you want. For instance for example, describing the “fierce dragon” as “fierce dragon” might be more effective than using the word “dragon.”
- Watch it come to reality: Once you’re satisfied with your text, click”Generate” or click the “Generate” button and watch as Meshy AI turns your words into an 3D masterpiece!
3. Image-to-3D: Bringing 2D to Life:
- Choose the image you want to use: Select a clear and high-quality image that reflects the 3D model you’d like to build. Images with distinct shapes and features are ideal.
- upload and fine-tune: Upload your chosen image, and then use editing tools to tweak the brightness, contrast, and crop certain areas to achieve greater results.
- Select your preferred style: Meshy AI offers diverse styles, including cartoon, voxel, or realistic. Try different styles to discover the one that best fits your style and artistic style.
4. Style, Textures, and More:
- Create your own style: Dive into the numerous styles offered. Play with cartoons or create retro pixel art using the voxel technique, or choose traditional realist designs. Each style gives a distinct personality to your work.
- Texture the model: Improve your design with different textures, such as metal, wood or even fabric. Meshy AI gives you a number of options for customizing the appearance of your surface.
- Enhance your model: Use the additional options like light and angle to alter the overall style and appearance the model.
5. Refine and Export:
- Polish your precious gem: Use the available editing tools to make final modifications to your model’s information size, position, or size.
- Are you ready to share your creation? Export or save your creation in a variety of formats such as FBX, GLB, or USDZ for use with other 3D software or sharing online.
- Explore the advanced capabilities: Paid plans offer advanced editing tools such as animation and post-processing which allow users to take their creations to a new level.
Image-to-3D with Meshy AI
Meshy AI’s image-to-3D feature can make it happen! But choosing the correct image and knowing the parameters is essential for the best outcomes. Here’s your guide:
Finding the Perfect Image:
- Format is important: Stick to common image formats such as JPEG, PNG, or BMP. Avoid GIFs and animation images.
- Quality is the most important factor: Use high-resolution images with sharp details and excellent lighting. Blurry or pixelated pictures pixels may not translate properly.
- Content is the king: Choose images with distinct shapes and clear lines. Photos with background clutter or complicated backgrounds could be a challenge.
- Think of 3D possibility: Imagine your image appearing as 3D. Does it have a clear depth and easily identifiable characteristics? The more 3D-ready your photo is, the better its conversion.
Uploading and Selecting:
- Select “Image to 3D” on the Meshy AI website.
- Drag your picture and drop it to the right or select “Browse” to select it from your device.
- Preview and alter: Use the zoom and pan options to ensure that the area you want to image is chosen.
- Rotate and crop: If needed, utilize the tools to narrow your focus on the most important part of your photo.
Beyond the Basics:
- Adjust your image’s quality: Adjust brightness, contrast, or saturation by using the tools that are available to increase clarity.
- Find styles to explore: Pick from a variety of styles including cartoon, voxel or low-poly to complement your vision. Experiment to find the best fit!
- HTML0The magic of material Use different materials like metal, wood or even fabric to give the depth and details to your work.
Style Savvy:
- Cartoons: Perfect for playful and whimsical designs. Think vibrant colors and over-the-top features.
- Voxel It creates beautiful, blocksy designs with a vintage style. Great for simple shapes or pixel art.
- Realistic: It aims to create a real-life image representation, perfect for objects with a lot of detail as well as portraits.
- Low-poly: Provides an elegant minimalist style with a small number of polygons. Good for geometric or abstract designs.
Meshy AI Pricing
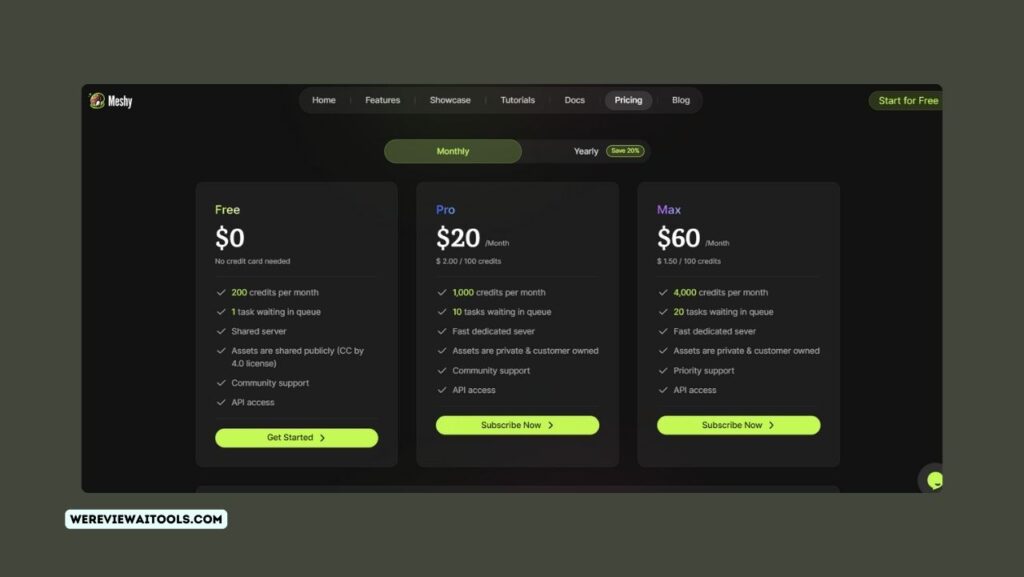
| Feature | Free | Pro (Monthly) | Pro (Yearly) | Max (Monthly) | Max (Yearly) |
|---|---|---|---|---|---|
| Cost | $0 | $20 | $16 | $60 | $48 |
| Credits per month | 200 | 1,000 | 1,000 | 4,000 | 4,000 |
| Cost per credit (monthly) | N/A | $0.02 | $0.016 | $0.015 | $0.012 |
| Tasks waiting in queue | 1 | 10 | 10 | 20 | 20 |
| Server | Shared | Dedicated | Dedicated | Dedicated | Dedicated |
| Asset privacy | Public (CC BY 4.0) | Private | Private | Private | Private |
| Support | Community | Community | Community | Priority | Priority |
| API access | Yes | Yes | Yes | Yes | Yes |
Conclusion
Overall,Meshy AI offered an opportunity for creators and allows users to show their creativity in their work and help in giving skill that is more demanded.Meshy AI is easy to use and have number of option help to make 3D creation easy for everyone.